Wednesday, May 23, 2018
How to check the IB cables is latched properly in DB/Storage nodes in Exadata .
for ib_cable in `ls /sys/class/net | grep ^ib`; do printf "$ib_cable: "; cat /sys/class/net/$ib_cable/carrier; done
The output should look similar to:
ib0: 1
ib1: 1
If anything other than "1" is reported, double check the cable connection.
Regards
Gurudatta N.R
Command to find the ILOM Ipaddress from the operating system
1) check ipmitool is installed
rpm -qa | grep ipmitool
ipmitool-1.8.12.4-0.el6.x86_64
If the ipmi rpm is installed you can run the following command
ipmitool lan print
[root@Sukhoi ~]# ipmitool lan print
Set in Progress : Set Complete
Auth Type Support : NONE MD2 MD5 PASSWORD
Auth Type Enable : Callback : MD2 MD5 PASSWORD
: User : MD2 MD5 PASSWORD
: Operator : MD2 MD5 PASSWORD
: Admin : MD2 MD5 PASSWORD
: OEM :
IP Address Source : Static Address
IP Address : XX.XX.XX.XX
Subnet Mask : XXX.XXX.XXX.XX
MAC Address : XX:XX:XX:XX:XX:XX
SNMP Community String : public
IP Header : TTL=0x00 Flags=0x00 Precedence=0x00 TOS=0x00
BMC ARP Control : ARP Responses Disabled, Gratuitous ARP Disabled
Gratituous ARP Intrvl : 5.0 seconds
Default Gateway IP : XX.XX.XX.XX
Default Gateway MAC : 00:00:00:00:00:00
Backup Gateway IP : 0.0.0.0
Backup Gateway MAC : 00:00:00:00:00:00
802.1q VLAN ID : Disabled
802.1q VLAN Priority : 0
RMCP+ Cipher Suites : 1,2,3
Cipher Suite Priv Max : XXXXXXXXXXXXXXX
: X=Cipher Suite Unused
: c=CALLBACK
: u=USER
: o=OPERATOR
: a=ADMIN
: O=OEM
How F20 Modules are connected in X4270 M2 in Exadata.
<- -="" exadata="" nbsp=""><----- ------="" linux="" software=""><-- --="" active="" pcie="" risers=""><--- -----="" aura="" card="" nbsp="">
Exadata s/w -> linux -> scsi -> mptsas -------> riser 1 IDT --------> IOC1 (slot 1) ------> 4 FMODS
| |
| ----> IOC0 (slot 4) ------> 4 FMODS
|
------> riser 2 IDT --------> IOC3 (slot 2) ------> 4 FMODS
|
----> IOC2 (slot 5) ------> 4 FMODS
.
Tuesday, April 10, 2018
Linux Signals
| Signal Name | Number | Description | ||
| SIGHUP | 1 | Hangup (POSIX) | ||
| SIGINT | 2 | Terminal interrupt (ANSI) | ||
| SIGQUIT | 3 | Terminal quit (POSIX) | ||
| SIGILL | 4 | Illegal instruction (ANSI) | ||
| SIGTRAP | 5 | Trace trap (POSIX) | ||
| SIGIOT | 6 | IOT Trap (4.2 BSD) | ||
| SIGBUS | 7 | BUS error (4.2 BSD) | ||
| SIGFPE | 8 | Floating point exception (ANSI) | ||
| SIGKILL | 9 | Kill(can't be caught or ignored) (POSIX) | ||
| SIGUSR1 | 10 | User defined signal 1 (POSIX) | ||
| SIGSEGV | 11 | Invalid memory segment access (ANSI) | ||
| SIGUSR2 | 12 | User defined signal 2 (POSIX) | ||
| SIGPIPE | 13 | Write on a pipe with no reader, Broken pipe (POSIX) | ||
| SIGALRM | 14 | Alarm clock (POSIX) | ||
| SIGTERM | 15 | Termination (ANSI) | ||
| SIGSTKFLT | 16 | Stack fault | ||
| SIGCHLD | 17 | Child process has stopped or exited, changed (POSIX) | ||
| SIGCONT | 18 | Continue executing, if stopped (POSIX) | ||
| SIGSTOP | 19 | Stop executing(can't be caught or ignored) (POSIX) | ||
| SIGTSTP | 20 | Terminal stop signal (POSIX) | ||
| SIGTTIN | 21 | Background process trying to read, from TTY (POSIX) | ||
| SIGTTOU | 22 | Background process trying to write, to TTY (POSIX) | ||
| SIGURG | 23 | Urgent condition on socket (4.2 BSD) | ||
| SIGXCPU | 24 | CPU limit exceeded (4.2 BSD) | ||
| SIGXFSZ | 25 | File size limit exceeded (4.2 BSD) | ||
| SIGVTALRM | 26 | Virtual alarm clock (4.2 BSD) | ||
| SIGPROF | 27 | Profiling alarm clock (4.2 BSD) | ||
| SIGWINCH | 28 | Window size change (4.3 BSD, Sun) | ||
| SIGIO | 29 | I/O now possible (4.2 BSD) | ||
| SIGPWR | 30 | Power failure restart (System V) |
Sunday, March 18, 2018
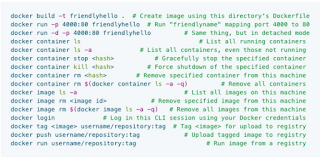
Docker Commands

command
to check the full container id
1) docker ps --no-trunc
2) docker run -d --name nginx ( -d is used to run in the background)
3) docker ps -a ( command to check the all docker image command will show all the images not running )
4) docker run -ti --name b2 busybox ( ti means Terminal interactive)
5) ps aux
6) deattach the container
6.1) docker run -ti name b3 busybox
6.2) ps aux; top
CTRL + P + Q detach from the terminal will run from the background
docker attach b3 .
7.0) command to run the command inside the container
docker exec
7.1) docker run -d --name ngnx2 nginx
7.2) docker exec ngnx2 ip a s
7.3) docker exec -ti nginx2 /bin/bash
7.4) ps aux
8.0) docker run --name b4 busybox ip a s will run the container and exit it
8.1) docker ps
9) docker run --name b10 -rm busybox ip a s ( the following command will run the busy box container and removed the container ) used to remove the junk dontainer
9) docker run -rm -u 500:500 busybox ( to find the user id and group id) busybox) container need uid/gid
10) proceed running in the contaier
11) docker top nginx
12) resource usage
13) docker stats nginx
14) stopping and killing container
15 ) docker stop nginx
16) docker start nginx; docker ps, default time to stop the container 10 sec
17) docker stop -t 15 nginx command to stop the container fter 15 sec.
18 to terminate the running container
docker kill Dockername
19) how to remove the container
19.1) docker rm < Docker name>
19.2) to check the container docker ps -a
19.3) docker stop; docker rm -f docker name
< >
19.4) docker rm -v docker name ( remove the docker with persistent data) be care full
19.5) Container logs
20)
20.1) docker logs < docker name>
20.2) docker logs will be stored in /var/lob docker/container
20.3) check for the container id
20.4) go to the directory
20.5) containerid-Jason.log will hold all the logs.
20.6) Config file are stored in json file.
20.7) docker logs -f
1) docker ps --no-trunc
2) docker run -d --name nginx ( -d is used to run in the background)
3) docker ps -a ( command to check the all docker image command will show all the images not running )
4) docker run -ti --name b2 busybox ( ti means Terminal interactive)
5) ps aux
6) deattach the container
6.1) docker run -ti name b3 busybox
6.2) ps aux; top
CTRL + P + Q detach from the terminal will run from the background
docker attach b3 .
7.0) command to run the command inside the container
docker exec
7.1) docker run -d --name ngnx2 nginx
7.2) docker exec ngnx2 ip a s
7.3) docker exec -ti nginx2 /bin/bash
7.4) ps aux
8.0) docker run --name b4 busybox ip a s will run the container and exit it
8.1) docker ps
9) docker run --name b10 -rm busybox ip a s ( the following command will run the busy box container and removed the container ) used to remove the junk dontainer
9) docker run -rm -u 500:500 busybox ( to find the user id and group id) busybox) container need uid/gid
10) proceed running in the contaier
11) docker top nginx
12) resource usage
13) docker stats nginx
14) stopping and killing container
15 ) docker stop nginx
16) docker start nginx; docker ps, default time to stop the container 10 sec
17) docker stop -t 15 nginx command to stop the container fter 15 sec.
18 to terminate the running container
docker kill Dockername
19) how to remove the container
19.1) docker rm < Docker name>
19.2) to check the container docker ps -a
19.3) docker stop
19.4) docker rm -v docker name ( remove the docker with persistent data) be care full
19.5) Container logs
20)
20.1) docker logs < docker name>
20.2) docker logs will be stored in /var/lob docker/container
20.3) check for the container id
20.4) go to the directory
20.5) containerid-Jason.log will hold all the logs.
20.6) Config file are stored in json file.
20.7) docker logs -f
20.8) docker run -it --name b10 busybox
20.9) Limit memory to container
22) docker run -d --name nginx3 -m 500M nginx
docker stats nginx3
22.1) docker run -d --name nginx4 nginx docker stats with out memory limit
docker stats nginx4
22.2) Memory reservation
22.4) docker run -d --name nginx5 -m 512M --memory-reservation 256M nginx
22.5) docker stats nginx5
To check the specific Docker image
1) Docker
search busybox
2) Official
image ( more stars)
3) Docker
search –s 50 busy box ( to search the minimum star)
4) Docker
pull nginx ( pull the latest version)
5) To
pull the specific image
6) Docker
pull nginix:1.9 it will download the 1.9 version nginx
7) Docker
images
8) Docker
pull –a busybox ( to pull all the layers)
9) Docker
images –a will list all the busybox images
10) Removing
the images
11) Docker rmi
busybox It will remove the latest tag
12) Docker rmi
–f busybox ( to remove the container when running ) not best method
13) Create a
new image using existing image
14) Docker run
–d –name nginx6 nginx
15) Docker
exec –ti nginix /bin/bash
16) Aptget
update
17) Docker
diff nginx 6 list all the changes in the container
18) Docker
commit –a “name of the author” –m “A message for the note” docknginix:1
To move to container
1) Save
and export
2) Docker
export nginix6 > nginix.tar ( will have only one layer)
3) Docker
export –o nginx6b.tar nginx6
4) tar
tvf tvf nginx6.tar
5) how
to import the tar archive
6) docker
import nginix6.tar nginx-own:latest
7) docker
images
8) docker
save –o nginix-save.tar nginx:latest
9) tar
tvf nginx-ta.tar | less
10) docker rmi
nginx
11) docker
load –I nginx-save.tar
12) docker
load –I nginix-save.tar
13) command to
upload the container to registry
14) #!/bin/bash
15) # Delete all containers
16) docker rm $(docker ps -a -q)
17) # Delete all images
18) docker rmi –f $(docker images -q)
 .
.
Tuesday, March 6, 2018
Linux crash-analyze The one tutorial that has it all
https://www.dedoimedo.com/computers/crash-analyze.html
Sunday, February 18, 2018
How to get the serial number of the disk in Linux .
#!/bin/bash
# NAME
# getSerial.sh - Get HDD/SDD serial number
echo ""
echo "Device name and Serial Number"
filename="/tmp/devices"
lsblk |grep disk | awk '{print $1}' > $filename
sed -i -e 's/^/\/dev\//' $filename
while read -r device
do
serial=$(smartctl -i $device |grep Serial)
printf '%s - %s\n' "$device" "$serial"
done < $filename
# -------------------------------------------------------------------
# EndOfFile
# -------------------------------------------------------------------
.
How to set the System_identifier in Engineered Systems.
At Linux prompt:
ipmitool sunoem cli 'set /SP system_identifier="Exadata Database Machine X3-2 AKXXXXXX”’
OR
In ilom:
set /SP system_identifier="Exadata Database Machine X3-2 AKXXXXXX"
Regards
Gurudatta N.R
Saturday, February 17, 2018
How to check the critical Alert logs in Exadata Cell nodes.
for i in 1 2 3 4 5 6 7
do
ssh root@cell{$i} “cellcli –e list alerthistory |grep –I critical”
done
do
ssh root@cell{$i} “cellcli –e list alerthistory |grep –I critical”
done
Thursday, February 15, 2018
Oracle Linux for SPARC
http://www.oracle.com/technetwork/server-storage/linux/downloads/oracle-linux-sparc-3665558.html
Monday, January 15, 2018
How to ping with the time stamp.
ping google.com | while read line; do echo `date` - $line; done
ping sukhoi.in.oracle.com | while read line; do echo `date` - $line; done
Wednesday, December 27, 2017
MegaCli Cheat sheet
Adapter parameter -aN
The parameter -aN (where N is a number starting with zero or the string ALL) specifies the PERC5/i adapter ID. If you have only one controller it’s safe to use ALL instead of a specific ID, but you’re encouraged to use the ID for everything that makes changes to your RAID configuration.
Physical drive parameter -PhysDrv [E:S]
For commands that operate on one or more pysical drives, the -PhysDrv [E:S] parameter is used, where E is the enclosure device ID in which the drive resides and S the slot number (starting with zero). You can get the enclosure device ID using “MegaCli -EncInfo -aALL”. The E:S syntax is also used for specifying the physical drives when creating a new RAID virtual drive.
Virtual drive parameter -Lx
The parameter -Lx is used for specifying the virtual drive (where x is a number starting with zero or the string all).
Controller information
Silence active alarm
Set state to offline
Rebuild drive
Walkthrough: Change/replace a drive
Set the drive offline, if it is not already offline due to an error
If you’re using hot spares then the replaced drive should become your new hot spare drive:
Source: Taken from the net.
Regards
Gurudatta N.R
The parameter -aN (where N is a number starting with zero or the string ALL) specifies the PERC5/i adapter ID. If you have only one controller it’s safe to use ALL instead of a specific ID, but you’re encouraged to use the ID for everything that makes changes to your RAID configuration.
Physical drive parameter -PhysDrv [E:S]
For commands that operate on one or more pysical drives, the -PhysDrv [E:S] parameter is used, where E is the enclosure device ID in which the drive resides and S the slot number (starting with zero). You can get the enclosure device ID using “MegaCli -EncInfo -aALL”. The E:S syntax is also used for specifying the physical drives when creating a new RAID virtual drive.
Virtual drive parameter -Lx
The parameter -Lx is used for specifying the virtual drive (where x is a number starting with zero or the string all).
Controller information
MegaCli -AdpAllInfo -aALLEnclosure information
MegaCli -CfgDsply -aALL
MegaCli -AdpEventLog -GetEvents -f events.log -aALL && cat events.log
MegaCli -EncInfo -aALLVirtual drive information
MegaCli -LDInfo -Lall -aALLPhysical drive information
MegaCli -PDList -aALLBattery backup information
MegaCli -PDInfo -PhysDrv [E:S] -aALL
MegaCli -AdpBbuCmd -aALLController management
Silence active alarm
MegaCli -AdpSetProp AlarmSilence -aALLDisable alarm
MegaCli -AdpSetProp AlarmDsbl -aALLEnable alarm
MegaCli -AdpSetProp AlarmEnbl -aALLPhysical drive management
Set state to offline
MegaCli -PDOffline -PhysDrv [E:S] -aNSet state to online
MegaCli -PDOnline -PhysDrv [E:S] -aNMark as missing
MegaCli -PDMarkMissing -PhysDrv [E:S] -aNPrepare for removal
MegaCli -PdPrpRmv -PhysDrv [E:S] -aNReplace missing drive
MegaCli -PdReplaceMissing -PhysDrv [E:S] -ArrayN -rowN -aNThe number N of the array parameter is the Span Reference you get using “MegaCli -CfgDsply -aALL” and the number N of the row parameter is the Physical Disk in that span or array starting with zero (it’s not the physical disk’s slot!).
Rebuild drive
MegaCli -PDRbld -Start -PhysDrv [E:S] -aNClear drive
MegaCli -PDRbld -Stop -PhysDrv [E:S] -aN
MegaCli -PDRbld -ShowProg -PhysDrv [E:S] -aN
MegaCli -PDClear -Start -PhysDrv [E:S] -aNBad to good (or back to good as I like to call it)
MegaCli -PDClear -Stop -PhysDrv [E:S] -aN
MegaCli -PDClear -ShowProg -PhysDrv [E:S] -aN
MegaCli -PDMakeGood -PhysDrv[E:S] -aNThis changes drive in state Unconfigured-Bad to Unconfigured-Good.
Walkthrough: Change/replace a drive
Set the drive offline, if it is not already offline due to an error
MegaCli -PDOffline -PhysDrv [E:S] -aNMark the drive as missing
MegaCli -PDMarkMissing -PhysDrv [E:S] -aNPrepare drive for removal
MegaCli -PDPrpRmv -PhysDrv [E:S] -aNChange/replace the drive
If you’re using hot spares then the replaced drive should become your new hot spare drive:
MegaCli -PDHSP -Set -PhysDrv [E:S] -aNIn case you’re not working with hot spares, you must re-add the new drive to your RAID virtual drive and start the rebuilding
MegaCli -PdReplaceMissing -PhysDrv [E:S] -ArrayN -rowN -aN
MegaCli -PDRbld -Start -PhysDrv [E:S] -aN
Source: Taken from the net.
Regards
Gurudatta N.R
Saturday, December 23, 2017
Flash Types.
MLC vs. eMLC vs. SLC vs. TLC
There are four types of NAND flash, differing in number of P/E cycles per lifetime, and defined by their construction:
- SLC -- Single Level Cell: the most expensive, longest lived (high P/E), and generally fastest. Bits are stored only as 2 voltage levels, or a "1" or "0." In SLC less data is stored per cell, so the per unit storage cost is higher.
- MLC -- Multi-Level Cell: is consumer grade and used in phones, cameras, and USB sticks. The stored charge in MLC may be interpreted as a variety of values, 0 to 3, or 4 possible states, and may store 2 bits. With shorter lifetimes, usually 10x less than SLC, the advantage of this memory is that the cost is 2- 4x less than SLC, but with lower write speeds. MLC typically uses some form of error correction code per block.
- eMLC -- Enterprise (grade) Multi-Level Cell: is MLC with longer life, usually because of an advanced controller operating the cell and error recovery techniques, construction density, or some combination of the two.
- TLC -- Triple Level Cell: championed by Samsung, TLC has higher power and error correction requirements, and higher wear levels. TLC is targeted at environments with predominant read uses, and has not been commonly used.
Regards
Gurudatta N.R
Wednesday, November 29, 2017
System is giving Panic with ( Vfs_mount issue ) in ZFS,
System is giving Panic with (
Vfs_mount issue ) in ZFS, Ensure disks associated with
rpool holds good.
Please perform the below action plan
boot from ISO or cdrom ( Solaris 11.2)
zpool import rpool
zpool status ( run scrub if required )
If there is faulty or offline error on any of the OS disk, please detach using "zpool detach rpool"
beadm list
beadm mount /a
bootadm update-archive -R /a -fv (update the archive )
bootadm install-bootloader -v -P rpool
beadm unmount
zpool export rpool
reboot
Also ensure in BIOS you see the right OS disk and you are booting off the same.
Regards
Gurduatta N.R
Please perform the below action plan
boot from ISO or cdrom ( Solaris 11.2)
zpool import rpool
zpool status ( run scrub if required )
If there is faulty or offline error on any of the OS disk, please detach using "zpool detach rpool
beadm list
beadm mount
bootadm update-archive -R /a -fv (update the archive )
bootadm install-bootloader -v -P rpool
beadm unmount
zpool export rpool
reboot
Also ensure in BIOS you see the right OS disk and you are booting off the same.
Regards
Gurduatta N.R
How to Recover from a System Crash in soaris.
- Boot the system from another bootable disk, installation DVD, or over the network.
-
SPARC: If you boot from installation media or an installation server
on the network, select the text installation. If you boot from an
installation server, use the following command:
ok boot net:dhcp
-
x86: If you boot from installation media or an installation server on
the network, select this text installation option from the GRUB menu:
Oracle Solaris 11 11/11 Text Installer and command line
-
Select option 3 Shell from the following menu:
        1  Install Oracle Solaris
        2  Install Additional Drivers
        3  Shell
        4  Terminal type (currently sun-color)
        5  Reboot

Please enter a number [1]: 3
To return to the main menu, exit the shell
-
SPARC: If you boot from installation media or an installation server
on the network, select the text installation. If you boot from an
installation server, use the following command:
- Import your ZFS root pool.
# zpool import -f rpool
- Mount the root BE.
# mkdir /a
# beadm mount solaris /a
- Restore your original fp.conf file (for FC multipathing) or mpt.conf (for SAS multipathing)
as follows.
- If you ran the stmsboot -e command or stmsboot -d command:
-
For SAS multipathing:
# cp /a/etc/mpxio/mpt.conf /a/etc/driver/drv/mpt.conf
-
For FC multipathing:
# cp /a/etc/mpxio/fp.conf /a/etc/driver/drv/fp.conf
-
For SAS multipathing:
- If you ran the stmsboot -u command, and you modified either the fp.conf file or the mpt.conf undo the changes you made to this file by editing either the /a/etc/driver/drv/fp.conf or the /a/etc/driver/drv/mpt.conf files.
- If you ran the stmsboot -e command or stmsboot -d command:
- Undo any other changes you made to the multipathing configuration prior to running
the stmsboot command.For example, if you modified the scsi_vhci.conf file, undo the changes you made to
this file by editing the /a/etc/driver/drv/scsi_vhci.conf file.
If you modified the device settings of your storage arrays, restore their original settings. - Restore your original /etc/vfstab file:
# cp /a/etc/mpxio/vfstab /a/etc/vfstab
The /a/etc/mpxio/vfstab file is a copy your original /etc/vfstab file that the stmsboot command saved prior to updating your vfstab file. A /a/etc/mpxio/vfstab file will not exist if the stmsboot command has not modified your vfstab file. - If the system is running on the Oracle Solaris OS on an
x86 based system, perform the following steps:
- Restore your original /boot/solaris/bootenv.rc file.
# cp /a/etc/mpxio/bootenv.rc /a/boot/solaris/bootenv.rc
The /a/etc/mpxio/bootenv.rc file is a copy your original /boot/solaris/bootenv.rc file that the stmsboot command saved prior to updating your bootenv.rc file. A /a/etc/mpxio/bootenv.rc file will not exist if the stmsboot command has not modified your bootenv.rc file. - Update the boot archive.
# bootadm update-archive -R /a
- Restore your original /boot/solaris/bootenv.rc file.
- Disable the mpxio-upgrade service:
# /usr/sbin/svccfg -f /a/etc/mpxio/svccfg_recover
- Unmount the BE.
# beadm umount solaris
- Reboot the system
- https://docs.oracle.com/cd/E23824_01/html/E23097/getnl.html#scrolltoc
Saturday, November 25, 2017
How to collect the ILOM snapshot from the CLI interface.
1. Log in to the ILOM CLI interface.
Example:
# ssh 10.10.10.6
Password:
2. You will see a similar output:
Sun(TM) Integrated Lights Out Manager
Version 3.2.1.20
Copyright 2007 Sun Microsystems, Inc. All rights reserved.
Use is subject to license terms.
->
3. After the '->' prompt, type the command in below:
-> set /SP/diag/snapshot dataset=normal
Set 'dataset' to 'normal'
4. Type the following command:
-> set /SP/diag/snapshot dump_uri=sftp://user:@/
Examples:
-> set /SP/diag/snapshot dump_uri=sftp://root:password@10.20.30.10/temp
If the password contains special characters then put double quotes around the password
-> set /SP/diag/snapshot dump_uri=sftp://root:"pw with blanks"@10.20.30.10/temp
or use use the related Hex ASCII values
-> set /SP/diag/snapshot dump_uri=sftp://root:pw%20with%20blanks@10.20.30.10/temp
5. Next cd to the snapshot directory and view the status:
-> cd /SP/diag/snapshot
-> show
* Verify that the status shown under properties is 'Running':
Properties:
dataset = normal
dump_uri = (Cannot show property)
encrypt_output = false
** result = Running **
1. Log in to the ILOM CLI interface.
Example:
# ssh 10.10.10.6
Password:
2. You will see a similar output:
Sun(TM) Integrated Lights Out Manager
Version 3.2.1.20
Copyright 2007 Sun Microsystems, Inc. All rights reserved.
Use is subject to license terms.
->
3. After the '->' prompt, type the command in below:
-> set /SP/diag/snapshot dataset=normal
Set 'dataset' to 'normal'
4. Type the following command:
-> set /SP/diag/snapshot dump_uri=sftp://user:
Examples:
-> set /SP/diag/snapshot dump_uri=sftp://root:password@10.20.30.10/temp
If the password contains special characters then put double quotes around the password
-> set /SP/diag/snapshot dump_uri=sftp://root:"pw with blanks"@10.20.30.10/temp
or use use the related Hex ASCII values
-> set /SP/diag/snapshot dump_uri=sftp://root:pw%20with%20blanks@10.20.30.10/temp
5. Next cd to the snapshot directory and view the status:
-> cd /SP/diag/snapshot
-> show
* Verify that the status shown under properties is 'Running':
Properties:
dataset = normal
dump_uri = (Cannot show property)
encrypt_output = false
** result = Running **
Sunday, November 19, 2017

Monday, October 23, 2017
ZFS Architecture
• ZPL: ZFS POSIX Layer
• ZVOL: ZFS Volumes
• ZIL: ZFS Intent Log
• ZAP: ZFS Attribute Processor
• DMU: Data Management Unit
• DSL: Dataset & Snapshot Layer
• ARC: Adaptive Replacement Cache
• ZIO: ZFS I/O Pipeline
• VDEV: Virtual Devices
• LDI: Layered Driver Interface

Regards
Gurudatta N.R
• ZVOL: ZFS Volumes
• ZIL: ZFS Intent Log
• ZAP: ZFS Attribute Processor
• DMU: Data Management Unit
• DSL: Dataset & Snapshot Layer
• ARC: Adaptive Replacement Cache
• ZIO: ZFS I/O Pipeline
• VDEV: Virtual Devices
• LDI: Layered Driver Interface

Regards
Gurudatta N.R
How to set up a TFTP server in Solaris 11.
How to set up a TFTP server in Solaris 11.
a. Please verify that TFTP server package is installed in the server
# pkginfo -l SUNWtftp
PKGINST: SUNWtftp
NAME: Trivial File Transfer Server
CATEGORY: system
ARCH: i386
VERSION: 11.11,REV=2009.11.11
BASEDIR: /
VENDOR: Oracle Corporation
DESC: Trivial File Transfer Server
INSTDATE: Oct 20 2017 16:36
HOTLINE: Please contact your local service provider
STATUS: completely installed
b) Create the /tftpboot dir
# mkdir /tftpboot
# chown root /tftpboot
# chmod 755 /tftpboot
c) Enable the tftp service
# svcadm enable svc:/network/tftp/udp6:default
Verify TFTP is working, by using TFTP to put or get files, to or from the /tftpboot directory.
Regards
Gurudatta N.R
How to install the GIT on OEL/Centos
$ sudo yum install curl-devel expat-devel gettext-devel openssl-devel zlib-devel -y
$ sudo yum install gcc perl-ExtUtils-MakeMaker -y
Download the latest Git installation from kernel.org and unpack it
$ cd /usr/src
$ sudo wget https://www.kernel.org/pub/software/scm/git/git-2.10.2.tar.gz
$ sudo tar xzf git-2.10.2.tar.gz
Install it
cd git-2.10.2
sudo make prefix=/usr/local/git all
sudo make prefix=/usr/local/git install
Add it to path
$ export PATH=/usr/local/git/bin:$PATH
(add that line to ~/.bash_profile)
Test it, by checking the version
$ git --version
Regards
Gurudatta N.R
Subscribe to:
Posts (Atom)